To continue my discussion into CAD UI and usability Optimisation (for Part 2 - see here), below.
Now is time for the good stuff, how I setup my CAD user interface and peripherals.
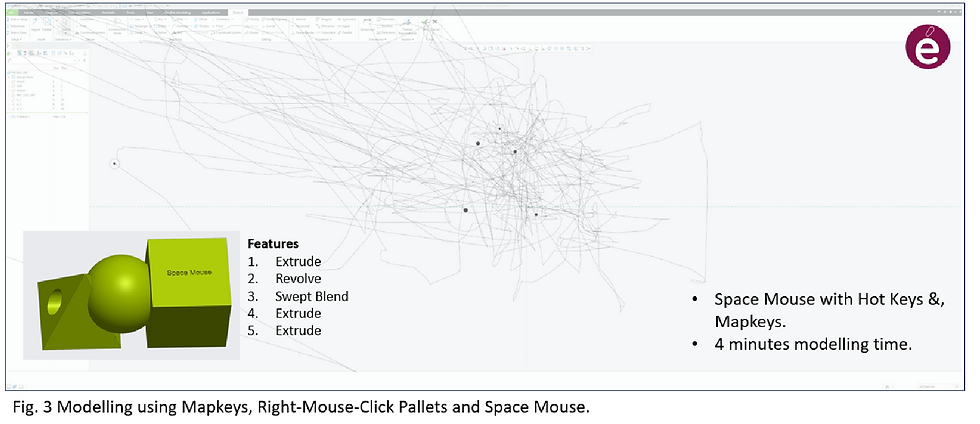
Figure 3 shows the optimised workflows for creating a simple CAD model from my recent Case Study. The Optimisations resulted in reduced mouse cursor movements across the screen and a 233% increase in modelling efficiency.
The setup of my CAD usability environment comprises the following tools and workflows;
Mapkeys
These are two letter keystrokes on the keyboard to activate pre-recorded mouse flows and button clicks.
i.e. Pressing ‘EX’ then selecting sketching plane takes me directly into the sketcher to create an extruded feature (protrusion, surface or cut).
One of my favourites is Mapkeys for turning layers on and off.
i.e. toggling curves (;; and ’’ ), quilts (kk and ll) and imported geometry from skeletons (hh and jj).
Why these Mapkeys? Simply they were not used for anything else and nicely lined up for me to cycle through. Now they are so engrained in my modelling psyche I can’t live without them. They are dependent on layer rules being setup in my config file.
Onscreen pallets
These are out of the box pallets that pop up when you select geometry and the click the right mouse button.
The pallet will automatically vary to the features that available for the geometry you have selected.
These can also be customised/optimised for your own high use features.
CREO RMB Click Menu

SolidWorks RMB Mouse Gestures

3Dconnexion SpaceMouse Wireless 3D Mouse
The SpaceMouse allows me to separate modelling rotation, zooming and panning in my left hand away from the mouse in my right.

Gone are the days when you have to hold down the CTRL or SHIFT key and press the middle mouse button to toggle between rotate and pan.
The Hot Keys on the Space mouse, indicated above, allocated to CTRL and SHIFT also aid with feature selection by the mouse.
Logitech MX Master 3S Wireless Mouse with hotkeys.
I assign mouse hotkeys to Function F9 & F10 Mapkeys which activates the model regeneration process in parts and assemblies respectively.

As I use top-down design with reference sharing, I regenerate regularly.
This mouse also has MagSpeed ® scroll wheel which is great for:
rapid zooming and when used in conjunction with the SpaceMouse for model rotation allows for an impressive level of model navigation.
Rapidly scrolling up and down model trees.
All the progression discussed so far has been around CAD modelling efficiencies and optimisations. But we are people as well as designers and there are benefits for the individual driving CAD by optimising UI and the usability environment that go beyond pure efficiencies.. But more on that in part 4.
In the meantime, I am interested to hear your thoughts and experiences in how you model.
For more information on modelling practices and workflows or the services I can offer you, feel free to reach out via LinkedIn or email.
Comments